📄 Flat File Connector
How to configure your Flatfile Connector for fetching users and access data
Flat File Structure Overview
There are certain standard fields that Lumos expects from any flatfile or CSV upload:
- Unique ID: A unique identifier for each account
- First Name & Last Name: Full name
- Email: Corporate email address
- Status: Account status using the following enums:
ACTIVE = 'ACTIVE' INACTIVE = 'INACTIVE' SUSPENDED = 'SUSPENDED' DEPROVISIONED = 'DEPROVISIONED' PENDING = 'PENDING' DELETED = 'DELETED' - Additional attributes and permissions can be added as needed.
- The only required fields are email OR full name (first name AND last name).
Flat File EncodingThe flat file connector works best with flat files encoded in UTF-8. If you are importing a file created in Microsoft Excel, here are the steps to convert it to UTF-8.
- Go to File >> Save As
- Go to the dropdown list for Save as type
- Click on CSV UTF-8 (Comma Delimited)
Sync Cadence
Lumos automatically pulls data from flatfile connectors through platform-wide scheduled integration syncs, which are set to occur daily by default.
S3 Connection Configuration
For each application you wish to upload, you must connect to an S3 bucket, specify the file name, and define the mapping for Lumos to ingest user and access data. You can use the same S3 bucket for multiple applications; just ensure you repeat the process of connecting, and specify unique filenames and mappings for each application.
Connecting to an S3 Bucket via Access Key ID
- Click on the Flatfile connector tile in the integrations tab.
- When the instructions pop up, input the following information:
- Access Key ID: the access key ID for the AWS account which contains the S3 bucket
- Secret Access Key: the secret access key for the AWS account which contains the S3 bucket
- S3 Bucket Name: the name of the S3 bucket
- S3 File Name: the name of the file within the S3 bucket that will be read
- Once all that information is inputted, click connect.
Connecting to an S3 Bucket via IAM Role
-
Click on the Flatfile connector tile in the integrations tab.
-
When the instructions pop up, find the Lumos-generated external ID.
-
Create the trust policy in AWS
- In AWS, go to IAM >> Roles >> Create Role. Once there, select Custom Trust Policy
- Copy the following code for the custom trust policy, replacing
lumos-external-idwith the external ID from step 2. Once done, click Next
{ "Version": "2012-10-17", "Statement": [ { "Sid": "Statement1", "Effect": "Allow", "Principal": { "AWS": "arn:aws:iam::349123981986:user/global-service-account" }, "Action": "sts:AssumeRole", "Condition": { "StringEquals": { "sts:ExternalId": "<lumos-external-id>" } } } ] }- On Add permissions, click Next with no further action.
- On Name, review, create, enter a name for the role. For the rest of the documentation, this role will be named LumosIntegrationRole.
- Add any optional tags needed for your org. LumosIntegrationRole does not require any tags.
- Click Create Role
-
Provide access to the Integration
- Go to IAM >> Role, the find and click into LumosIntegrationRole.
- Navigate to Permissions >> Permission policies. Click on the Add permissions dropdown and click on Create inline policy.
- Copy the following code for the inline policy, replacing
<bucket-name>with the name of the S3 bucket.{ "Version": "2012-10-17", "Statement": [ { "Effect": "Allow", "Action": "s3:ListBucket", "Resource": "arn:aws:s3:::<bucket-name>" }, { "Effect": "Allow", "Action": "s3:GetObject", "Resource": "arn:aws:s3:::<bucket-name>/*" } ] } - On the Review and create page, Give the policy a name, then click Create policy.
- Copy the role ARN for the policy.
-
In the Lumos instructions, input the following information.
- AWS IAM Role ARN: The role ARN created in the previous step
- S3 Bucket Name: the name of the S3 bucket
- S3 File Name: the name of the file within the S3 bucket that will be read
-
Once all that information is inputted, click connect.
Connecting to an S3 Bucket with Private Access (On Prem only)
If you are running the On Prem version of the Flat File connector and running the docker deployment on ECS, you are able to connect to an S3 bucket by setting the container up to have access to the s3 bucket. In order to do this, you will need to configure the ECS task to have access to the bucket via a policy like the following
{
    "Statement": [
        {
            "Action": [
                "s3:GetObject",
                "s3:GetObjectVersion",
                "s3:GetBucketLocation",
                "s3:ListBucket",
                "s3:HeadBucket"
            ],
            "Effect": "Allow",
            "Resource": [
                "{your bucket name}"
            ]
        }
    ],
    "Version": "2012-10-17"
}
Once this is configured, select the "Flatfile Connector (On Prem) option on the integrations page. In the connection details, select AWS_S3_PRIVATE_ACCESS as the source type option. Enter your bucket name and file name, then click connect. At this point, you can follow the instructions for configuring the CSV mapping.
SFTP Connection Configuration
For each application you want to upload, connect to an SFTP server, provide the full file path, and define the user and access data mappings for Lumos ingestion. You can reuse the same SFTP bucket across multiple applications - just make sure to reconnect for each one and use unique filenames and mappings.
Connecting to an SFTP Server via Username and Password
- Click on the Flatfile connector tab in the integration tab.
- Input the following information:
- Username: the username used to log into the SFTP server.
- Password: the password used to authenticate with the SFTP server.
- Hostname: the address of the SFTP server.
- File path: the full file path of the file within the SFTP server that will be read.
- Once that information is inputted, click connect.
Connecting to an SFTP server via Key Pair
- Click on the Flatfile connector tab in the integration tab.
- Enter a unique key identifier to use, then click 'Get key'.
- Copy the public key and add it to the list of known keys on your SFTP server.
- Input the following information:
- Username: the username used to log into the SFTP server.
- Hostname: the address of the SFTP server.
- File path: the full file path of the file within the SFTP server that will be read.
- Once that information is inputted, click connect.
CSV Mapping Configuration
Data Preparation:
- Validate that each account has a unique identifier.
- Maintain consistent account status values with the expected enumerations.
Configuring field mappings
- Go to the application from the flatfile connection.
- Click Configure Mappings on the single app page.
- Map the fields in the CSV to fields in Lumos
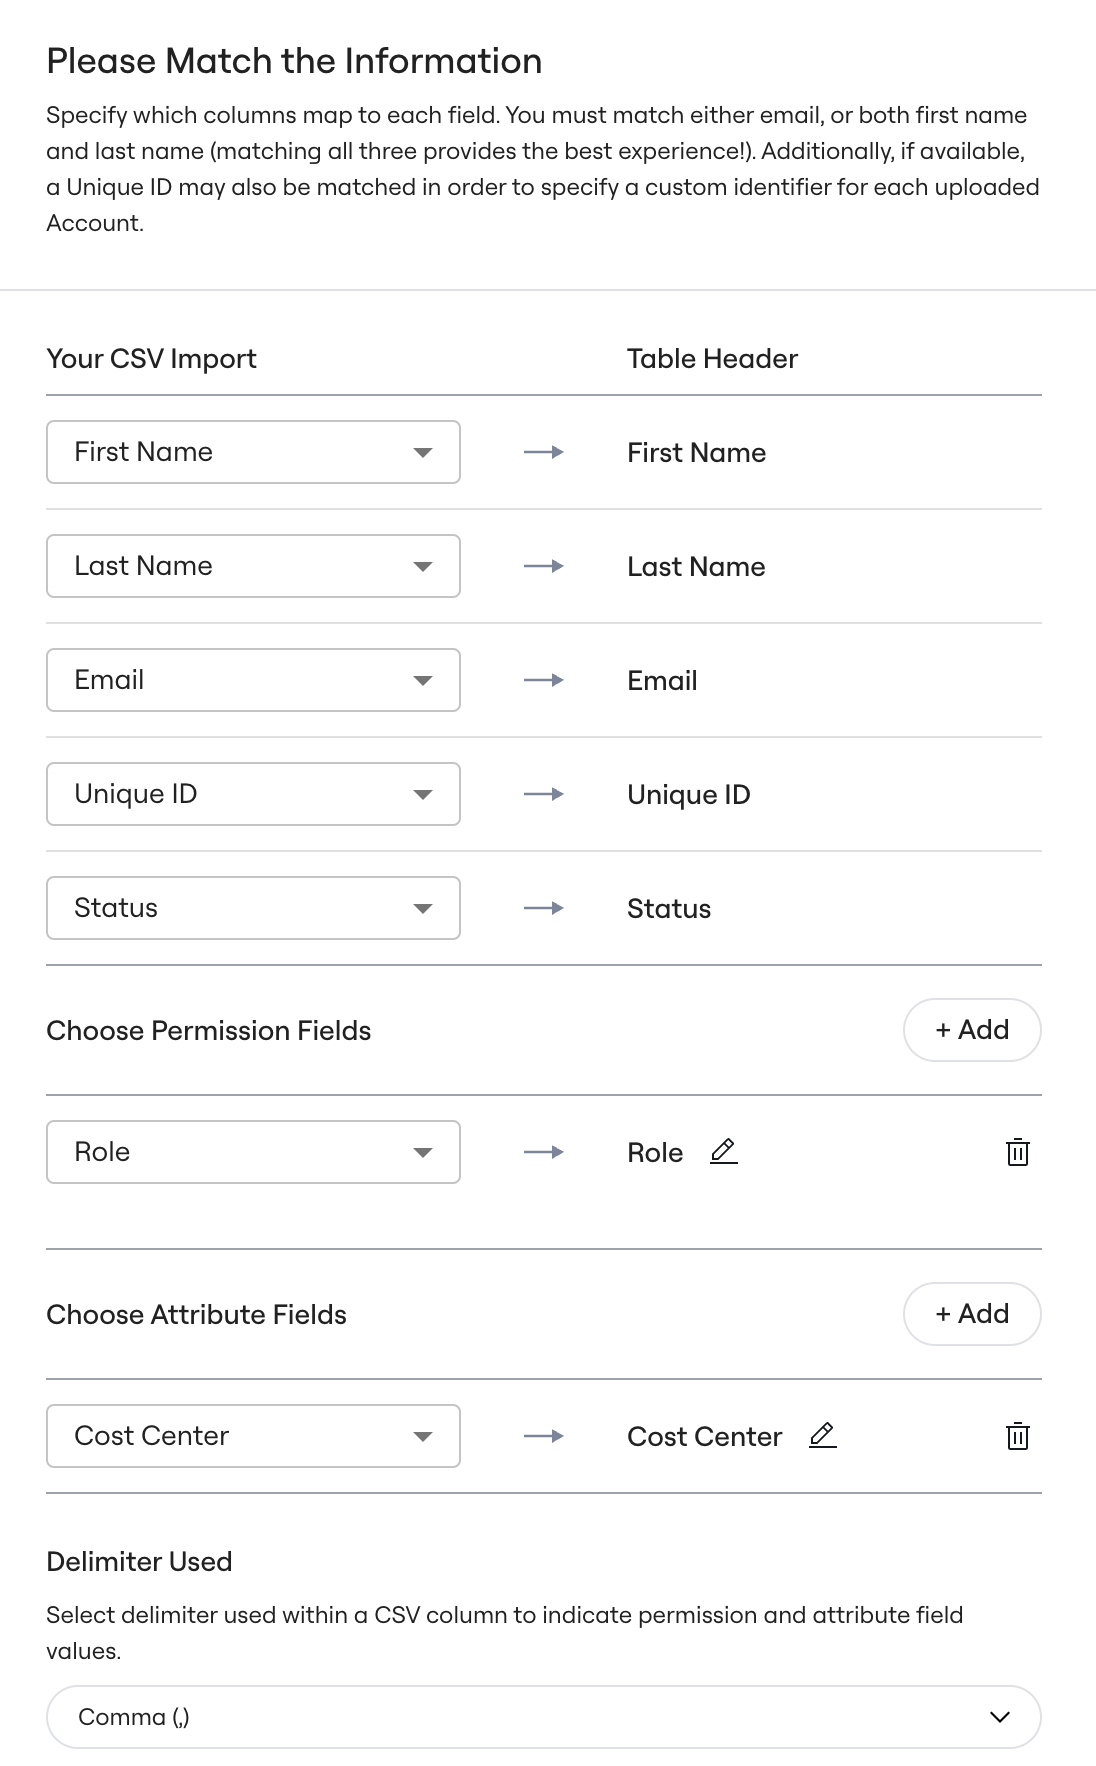
- Click Preview Table.
- Select Finish Import and you are all done.
Multiple Entitlements
Some flat files list each account–entitlement pair on its own row, so an account may span multiple rows. When processing these files, we determine each account’s Last Login and Last Activity by selecting the most recent timestamps across all rows for that account.
Conclusion
Configuring the flatfile connector involves specifying the connection details (e.g., connecting S3 bucket) and configuring field mappings to accurately ingest the user and group data in your environment. By following the detailed instructions above and using the provided examples, you should be able to set up the connector successfully and start synchronizing objects into Lumos.