📦 Installation
Lumos On-Premise Agent Installation on Windows and Containers
Overview
The Lumos On-Premise Agent is designed to bridge on-premise resources with the Lumos cloud service. This allows you to connect systems like Active Directory, LDAP, databases (via JDBC), and more. You can install the Lumos Agent in two ways:
- Windows Service – Install on a Windows Server (2016 or later).
- Container – Deploy within a container environment (Docker, AWS ECS, Google Cloud Run, Azure Container Instances, etc.).
The Lumos Agent can be installed on multiple machines to provide availability and scalability. This means repeating the steps below for your other machines. See this for an example high-availability architecture.
Pre-Requisites:
-
Operating System / Platform
- Windows 2016+ Server (x86 64-bit architecture only). The agent does not need to be installed on a Domain Controller.
- Container Service (Docker Engine, AWS Elastic Container Service, Google Cloud Run, Azure Container Instances, etc.)
- Note: ARM is not currently supported.
-
Hardware Requirements
- 16GB RAM
- 64GB storage
- If you have many on-premise integrations, you may need more RAM and storage.
-
Network Connectivity
- Outbound connectivity to https://integration-proxy.lumos.com on port 443.
- Ensure firewall or proxy settings allow outbound traffic over HTTPS (443).
- Internal connectivity to systems (directories, databases and custom applications) for Agent to communicate with.
-
Lumos On-Premise Agent Token
- Visit https://app.lumosidentity.com/settings/api_tokens
- Click on Add Token → On Prem Agent Token.
- Copy the generated token; you will need it for the environment variable
LUMOS_ON_PREMISE_AGENT_API_KEY
Common Steps:
Regardless of platform, you must ensure:
- Firewall:
- Outbound/egress port 443 is open for https://integration-proxy.lumos.com.
- Internal connectivity to systems (directories, databases and custom applications) for Agent to communicate with. For example, port 636 is open for Active Directory from the Agent host.
- Obtain Agent Token: Follow the steps in Prerequisites to obtain your Lumos On-Prem Agent token.
A) Windows Installation
A.1) Set Environment Variable
-
Go to Control Panel → System & Security → System.
-
Click Advanced system settings (on the left side).
-
Click Environment Variables (near the bottom).
-
Under System variables, click New.
- Variable name: LUMOS_ON_PREMISE_AGENT_API_KEY
- Variable value: Paste your token here
-
Click OK.
-
Make sure this is a system variable (not a user variable).
Tip: If you need to script this step, you can use PowerShell or command line with setx /M LUMOS_ON_PREMISE_AGENT_API_KEY "".
A.2) Place the Agent Files
-
Download the latest Windows On-Premise Agent zip file from Lumos. (You must be signed in at https://app.lumosidentity.com to access the download link).
- Example file name: Lumos-On-Premise-Agent-latest.zip
-
Create a folder to store the agent files (e.g., C:\lumos-on-premise-or-rename-this).
-
Unzip the downloaded file into this folder.
- Right-click and Extract
- Or use PowerShell:
# Navigate to the directory where you want the agent files to live
Set-Location C:\

# Create a new directory
New-Item -ItemType Directory -Name "lumos-on-premise-or-rename-this"

# Change to the new directory
Set-Location "lumos-on-premise-or-rename-this"

# Extract the contents of the .zip file
Expand-Archive -Path "C:\path\to\Lumos-On-Premise-Agent-latest.zip" -DestinationPath .
Important: Ensure the folder is accessible to the SYSTEM user if installing as a Windows Service.
A.3) Install and Configure Windows Service
- Open PowerShell as an Administrator
- Navigate to the agent directory (where lumos-agent.exe is located):
Set-Location C:\lumos-on-premise-or-rename-this- Install the Windows Service:
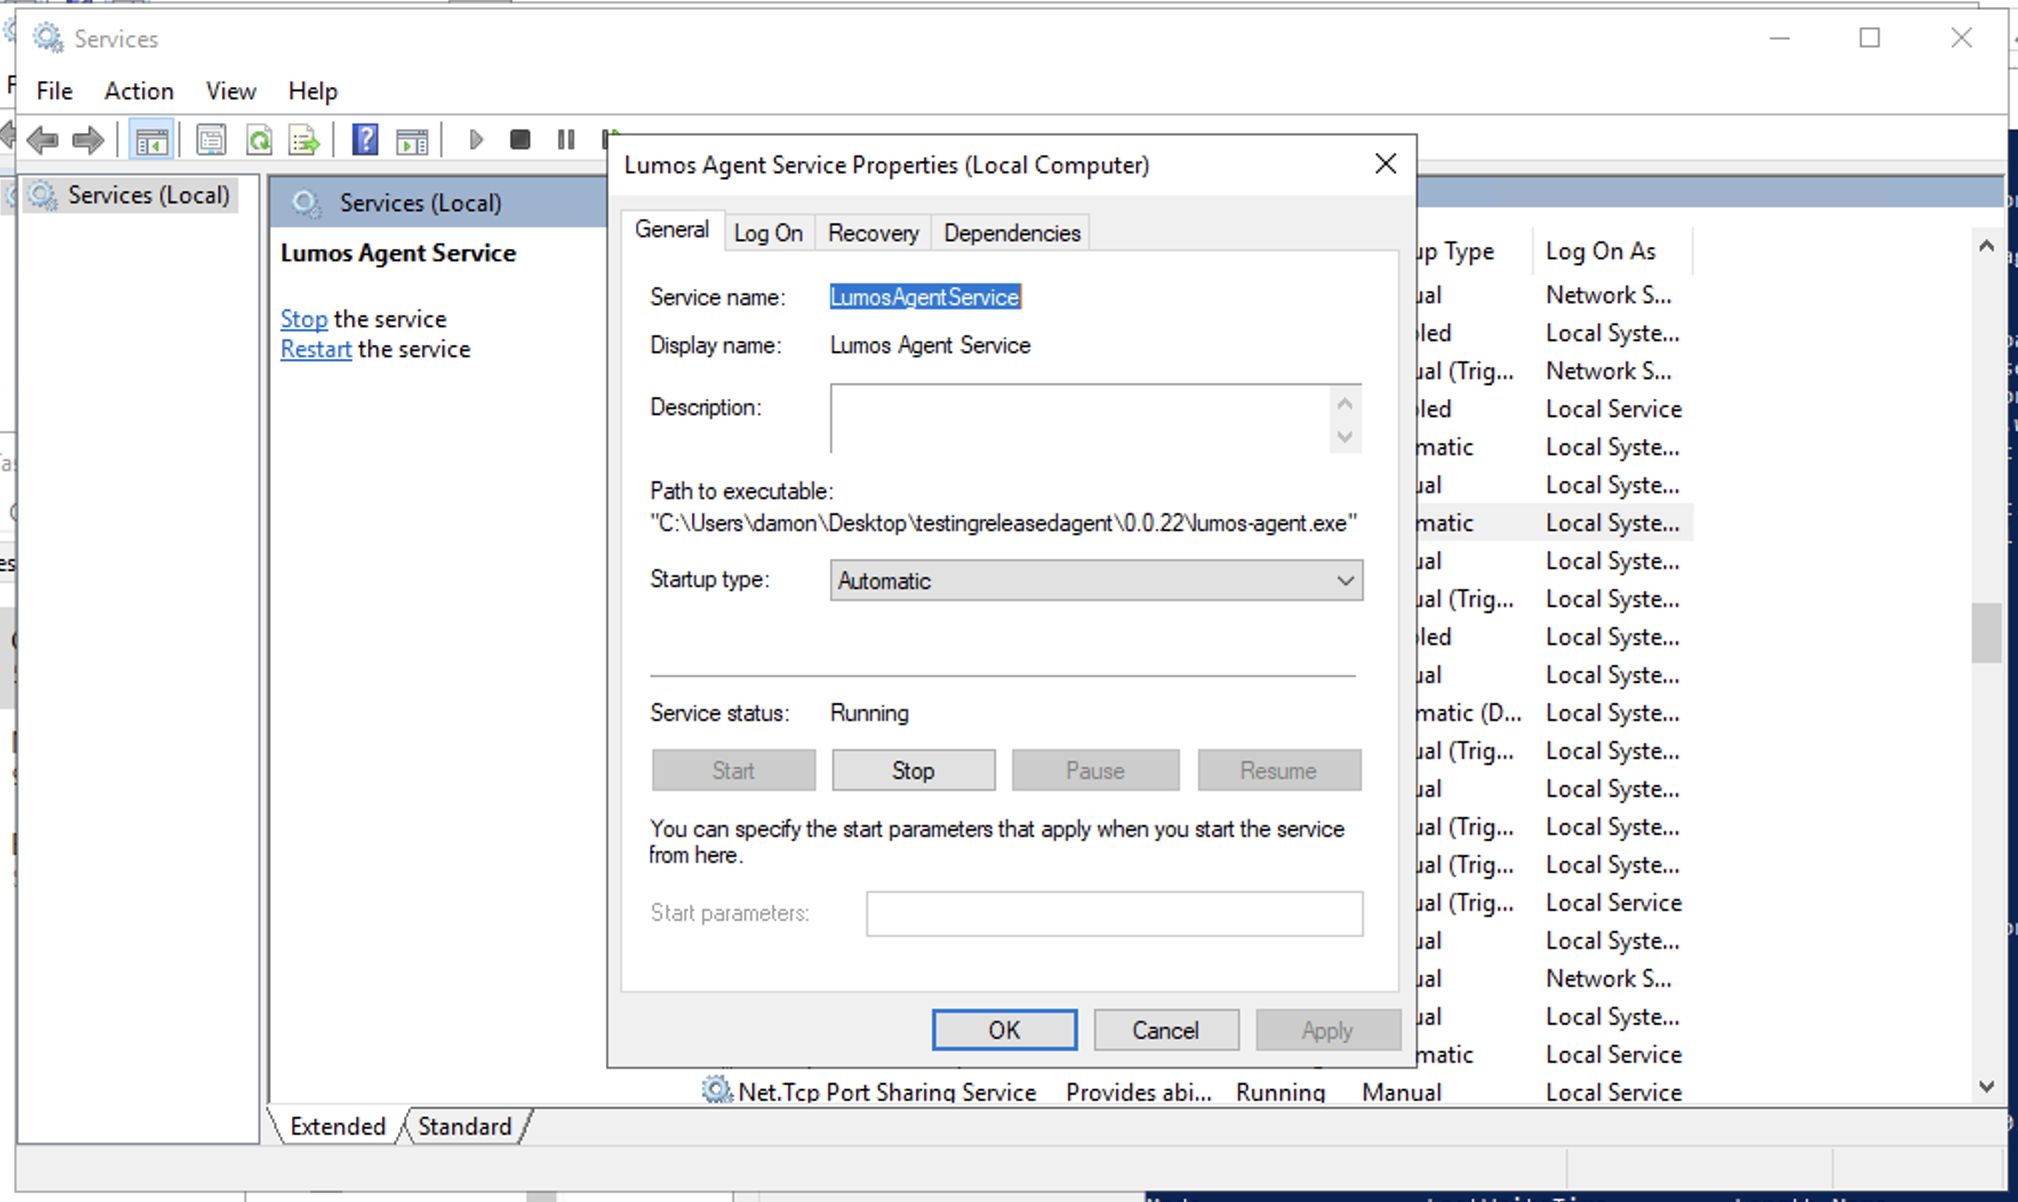
.\lumos-agent.exe install- Open the Services Manager:
- From Windows Start, search "Services" or run services.msc.
- Locate "Lumos Agent Service" in the list and open its settings:
- Set Startup type to Automatic (Delayed Start) from the drop-down menu.
- Go to the Recovery tab and set all three failure settings to "Restart the Service".
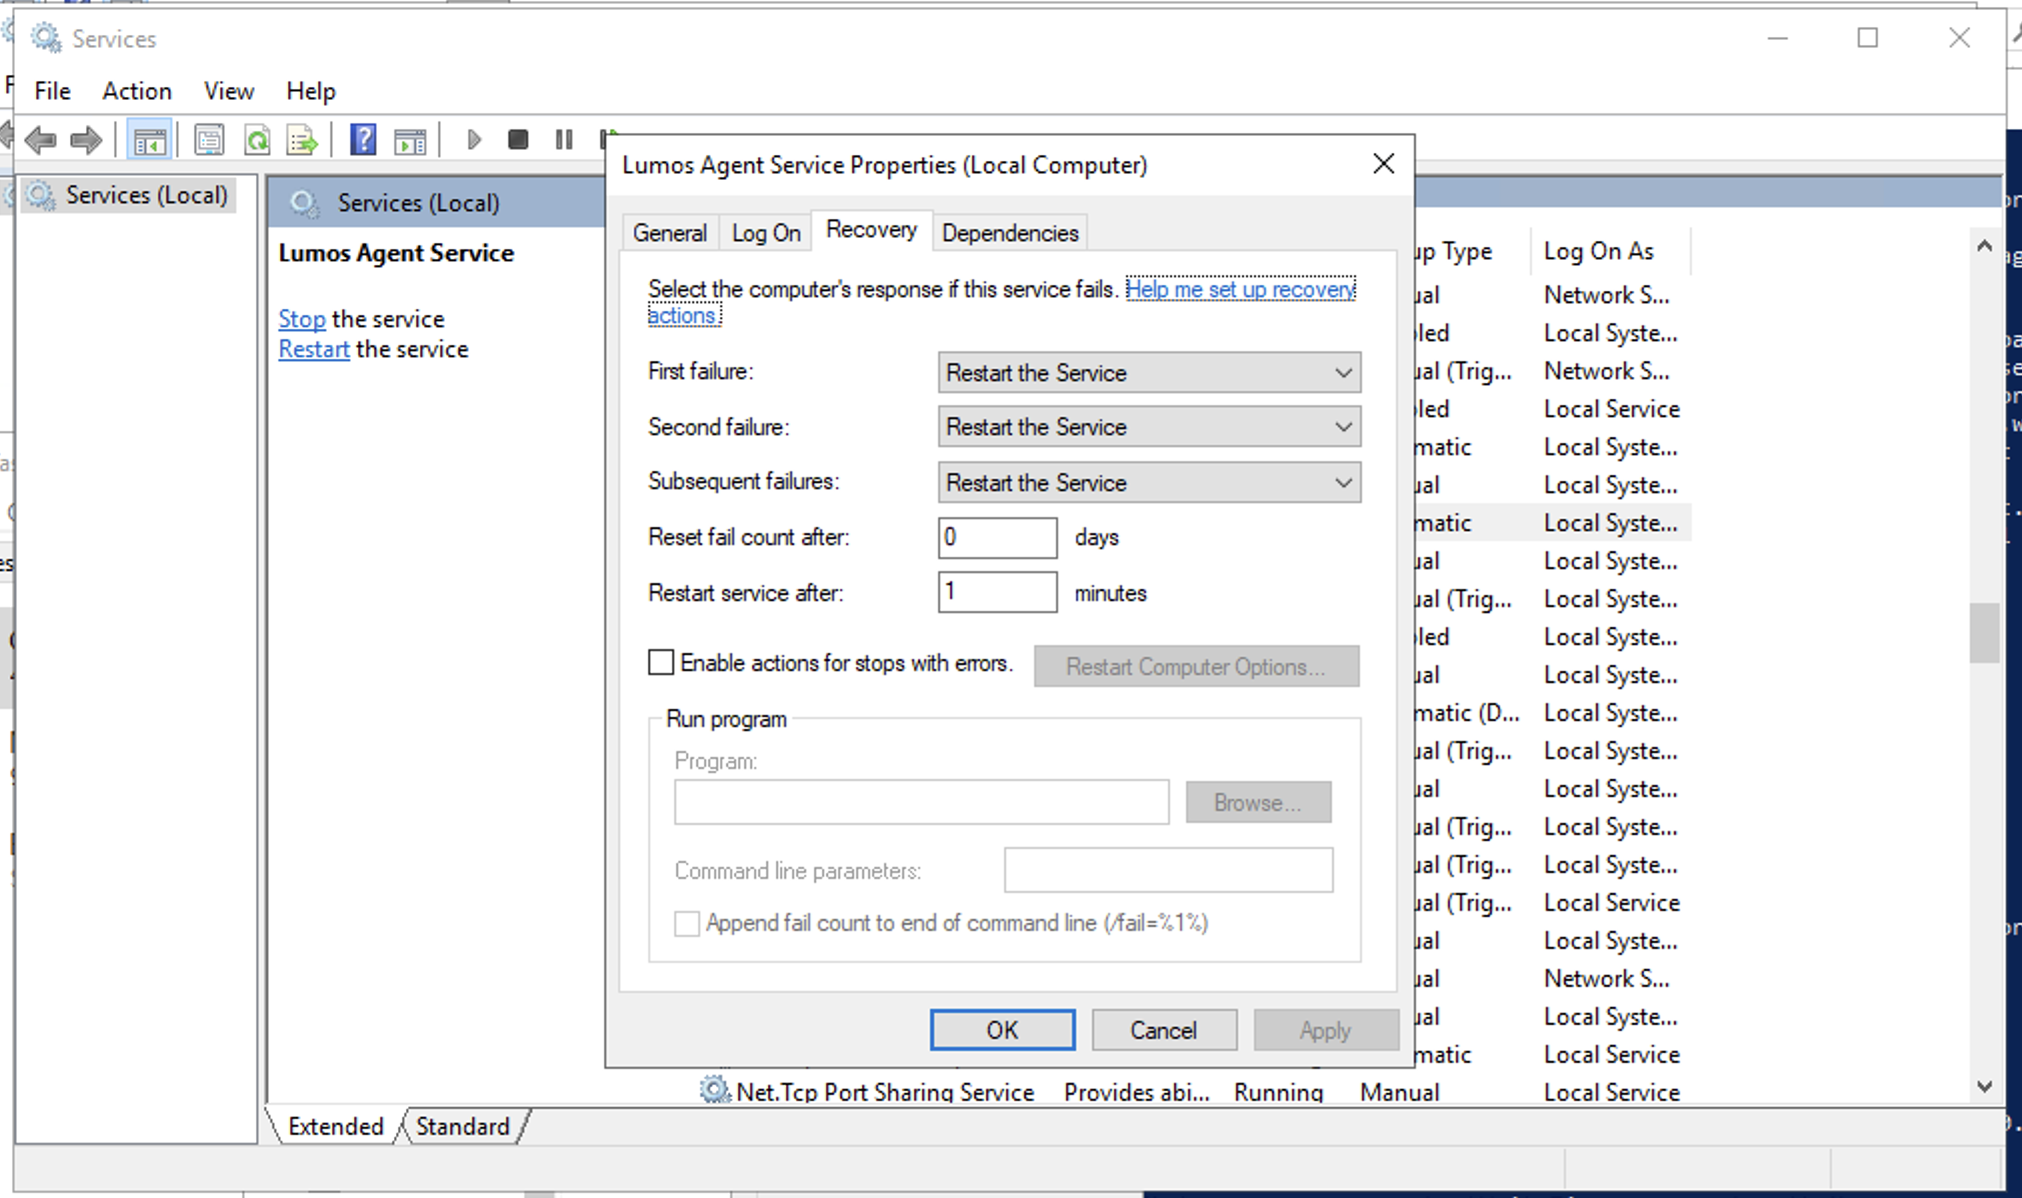
- Click Apply.
- Start the service:
- Return to the General tab.
- Click Start to begin running the Lumos Agent.
Tip: These settings ensure that the Lumos Agent stays running at all times and restarts on system reboot or in the event of failures.
B) Container Installation (Docker)
B.1) Set Environment Variable (Docker)
Before pulling the container image, ensure your Lumos Agent API key is available as an environment variable. For example, in Linux/macOS:
export LUMOS_ON_PREMISE_AGENT_API_KEY=lsk_...Note: If you are using Docker on Windows, you can set environment variables differently, e.g., in PowerShell:
$Env:LUMOS_ON_PREMISE_AGENT_API_KEY = "lsk_..."B.2) Pull and Run Lumos Container
- Pull the Docker image (from the provided ECR repository):
docker pull --platform linux/amd64 public.ecr.aws/lumos/on-premise-agent:latest- Run the container in detached mode with an automatic restart policy:
docker run --platform linux/amd64 -d \
  --restart unless-stopped \
  -e LUMOS_ON_PREMISE_AGENT_API_KEY=$LUMOS_ON_PREMISE_AGENT_API_KEY \
public.ecr.aws/lumos/on-premise-agent:latestNote:
- The --platform linux/amd64 flag ensures compatibility with x86_64 architecture.
- The environment variable LUMOS_ON_PREMISE_AGENT_API_KEY must be set in the Docker environment so the container can authenticate with Lumos.
B.3) Validate Deployment
After the container starts, you can validate it by listing running containers:
docker psYou should see an entry for the Lumos Agent container. To check logs or gain shell access inside the container:
docker exec -ti <CONTAINER ID> /bin/bash

# Once inside the container, you can look at log files:
more /onprem/agent/logs/<log_file_name>
If you encounter networking issues from the container - e.g. httpx.ConnectError in the logs - you can check to see if your container can even reach Lumos's API with this command.
docker run --platform linux/amd64 \
  --entrypoint /bin/bash \
  public.ecr.aws/lumos/on-premise-agent \
  -c 'wget -vvv https://integration-proxy.lumos.com/'
B.4) Additional Docker Tips
-
Automated Restarts: Using
--restart unless-stoppedensures the container restarts automatically if Docker restarts or if the container stops unexpectedly. -
Volume Mounts: If you want to persist logs or configuration, consider mounting a volume (
-v /my/local/path:/onprem/agent/logs) so logs are retained even if the container is recreated. -
Resource Constraints: If your Docker environment shares resources among multiple containers, set appropriate memory/CPU limits (e.g.,
--memory="16g" --cpus="4"). -
Orchestration Platforms: If deploying on ECS, Kubernetes, or other orchestration tools, translate the same environment variable and volume concepts to the relevant configuration (ECS Task Definition, Kubernetes Deployment YAML, etc.).
-
Pin your docker image version: You can view the list of ECR image tags here. We do periodic rebuilds - whenever the agent code changes, or weekly builds to get new connector versions and OS updates. Pinning your Docker version to e.g.
0.1.0will prevent surprise updates. An example pinned image looks likepublic.ecr.aws/lumos/on-premise-agent:0.1.0. We publish a changelog here that lists the changes to the agent and the on prem integrations. -
Log Levels If you wish to control the log level of the Lumos On Prem Agent and connectors, you can control this via the
LUMOS_ON_PREMISE_AGENT_LOG_LEVELenvironment variable. This environment variable can be set to any of the python standard logging levels found here, for exampleexport LUMOS_ON_PREMISE_AGENT_LOG_LEVEL='DEBUG'. In order to set this variable:... other env variable config export LUMOS_ON_PREMISE_AGENT_LOG_LEVEL='DEBUG'; docker run --platform linux/amd64 -d \ --restart unless-stopped \ -e LUMOS_ON_PREMISE_AGENT_API_KEY=$LUMOS_ON_PREMISE_AGENT_API_KEY \ -e LUMOS_ON_PREMISE_AGENT_LOG_LEVEL=$LUMOS_ON_PREMISE_AGENT_LOG_LEVEL \ public.ecr.aws/lumos/on-premise-agent:latest -
Log collection If you are deploying the Lumos On Prem agent as an ECS task (or a similar deployment solution) you may want to output all logs to stdout for collection via CloudWatch or another log collector. The environment variable
LUMOS_LOG_TO_STDOUTis a boolean flag that will cause the agent and all connectors to push their logs to stdout rather than the standard files. In order to set this variable:... other env variable config export LUMOS_LOG_TO_STDOUT=true docker run --platform linux/amd64 -d \ --restart unless-stopped \ -e LUMOS_ON_PREMISE_AGENT_API_KEY=$LUMOS_ON_PREMISE_AGENT_API_KEY \ -e LUMOS_LOG_TO_STDOUT=$LUMOS_LOG_TO_STDOUT \ public.ecr.aws/lumos/on-premise-agent:latest
Installation Confirmation
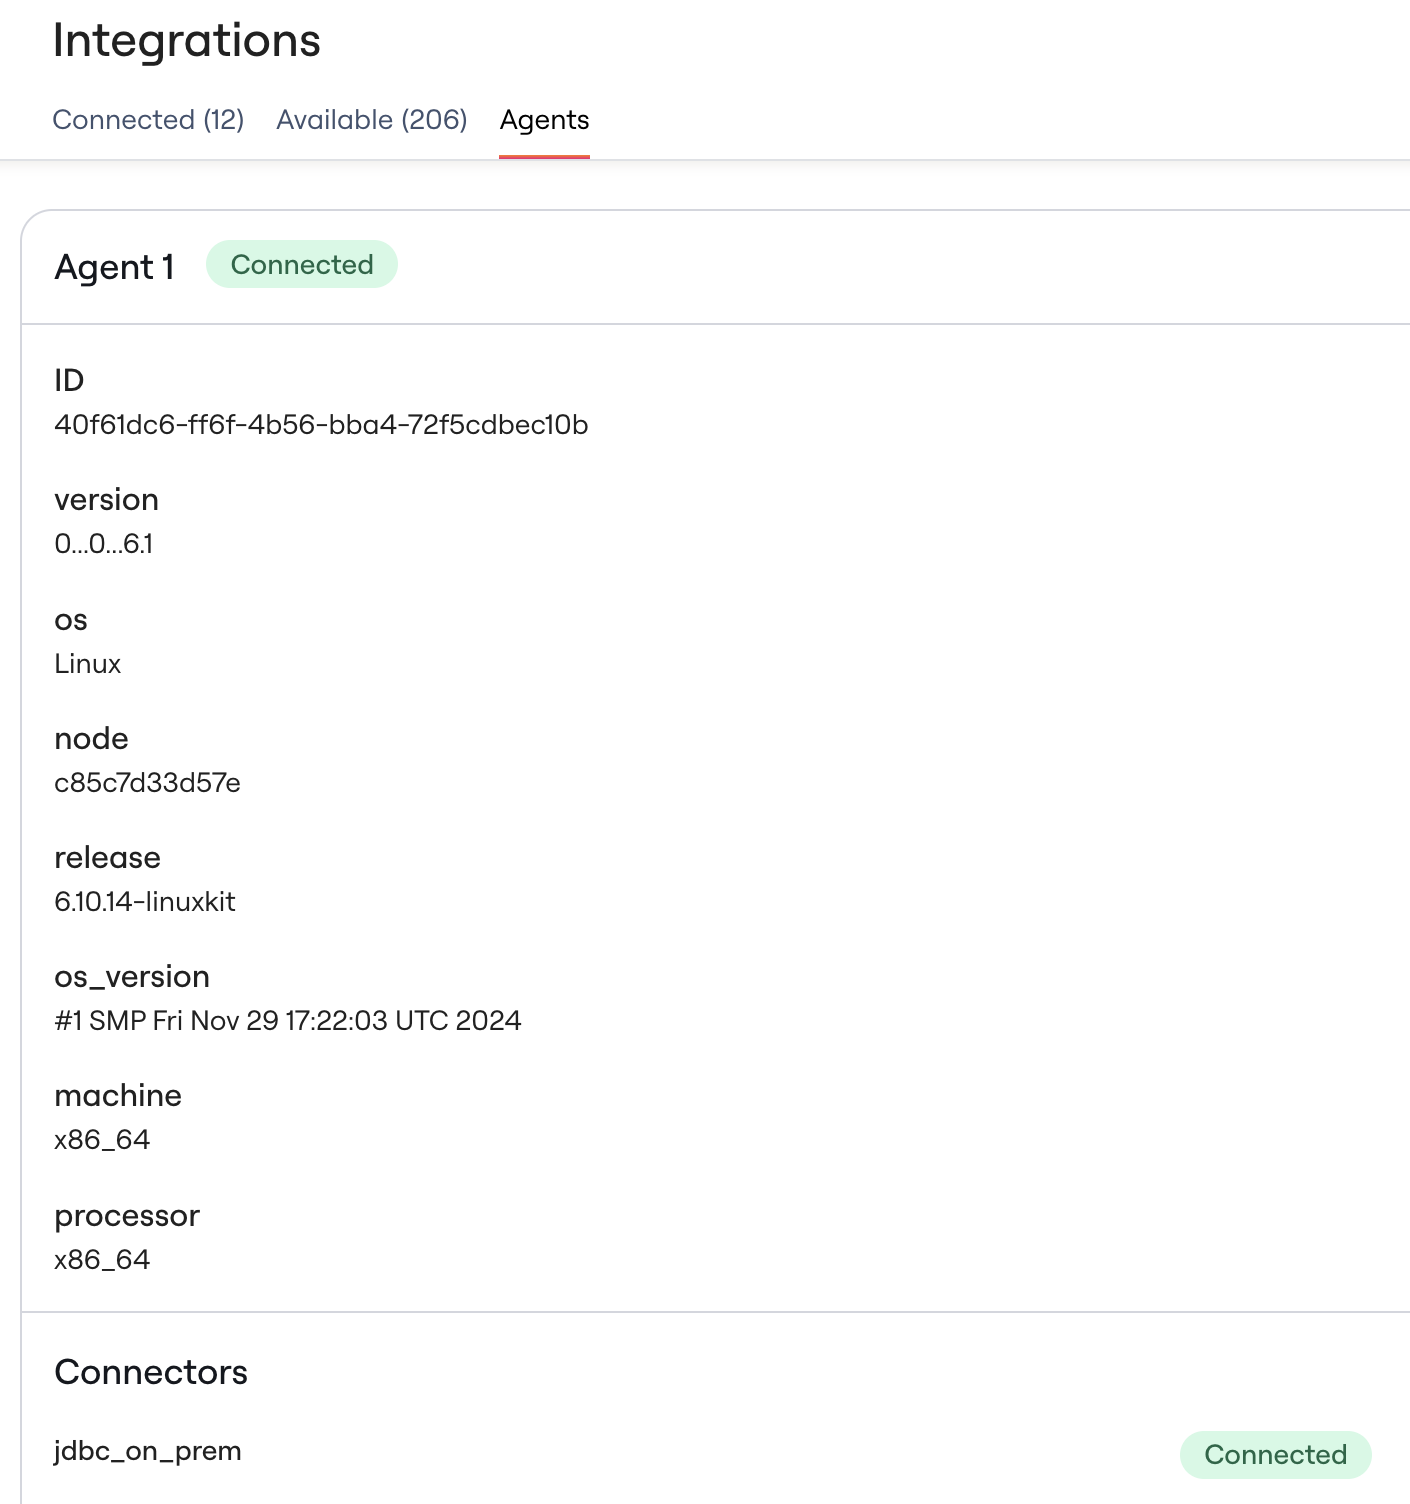
Once installed (on Windows or via Docker), you can confirm that the agent is connected by visiting:
- Integrations → Agents tab in Lumos Agents Status
If everything is set up correctly, you should see a status of Connected for your newly installed agent.
Connector Deployment
After the Lumos Agent has been installed, the next step is to deploy integration connectors (e.g., Active Directory, LDAP, JDBC, Custom, etc.,) for the specific use-case
On Windows
-
Go to https://app.lumosidentity.com/integrations?tab=can_integrate.
-
Click the Available tab (or search for the integration you want).
-
Select an On Premise tagged integration (e.g., Active Directory, LDAP, JDBC).
-
The second step of each integration wizard often provides a ZIP file. Download it.
-
Place the downloaded ZIP file into the connectors folder of your agent installation.
- Do not unzip the connector ZIP file; the agent will handle that automatically at runtime.
- There may be a delay between the service starting up and the connector appearing in Lumos.
On Containers
- The Lumos Agent container already bundles all connectors in the connectors folder by default, so no extra step is needed for typical use cases.
Updating the Agent and Connectors
To update your Lumos On Prem Agent and Connectors:
Linux
The latest version of the On Prem Agent Docker image will contain the latest version of the On Prem Agent and all connectors. The steps to update your image will depend on your deployment process.
Windows
In order to update the On Prem Agent on Windows, you need to download and install the latest versions of the Lumos On Prem Agent and all connectors you are running via the Lumos UI.
- Click on to the on prem integration you wish to update in the Lumos UI under the "Available" tab within the Integrations page.
- Download the latest On Prem Agent and Connector files from the first step of the connection wizard
- For every connector you wish to update, repeat steps 1 and 2, only downloading the connector files
- Within your windows server that the Agent is deployed on, stop the Lumos Agent Service
- Create a new directory, copy and extract the Agent zip file into that location
- Copy all downloaded connector files in the the /connectors folder - don't unzip them
- If you have any custom settings in the existing
settings.tomlfile, copy the contents into thesettings.tomlfile of the new directory - Open an admin Powershell session and navigate to the root directory of the newly unzipped folder
- Run
./lumos-agent.exe installto install the updated service definition - Run the service through Windows service manager
- Delete the old Agent folder
Safety When Updating
It is important to consider that it can take up to 15 minutes for a new agent instance to fully initialize and start processing operations. If you are running processes in Lumos that are utilizing the agent (syncs, bulk actions, removals, attribute sync), operations may fail if there is no agent with the required connectors available running.
To safely upgrade your agent, it is advised that you keep at least one agent running at all times when performing the upgrade that contains all of the connectors you are utilizing and for each cluster you have established.
For example, if you are running two agents that are running both the Active Directory and JDBC connector:
- Perform the process detailed above for Agent A while leaving Agent B alone
- Wait 15 minutes and validate in the Lumos UI that the new version of Agent A is running and all used connectors are shown in the UI
- Perform the process detailed above for Agent B
- Validate in the Lumos UI that the new version of Agent B is running and all used connectors are shown in the UI
If you are running two clusters with two agents in each:
- Perform the process detailed above for Agent A in cluster 1 and Agent A in cluster 2
- Wait 15 minutes and validate in the Lumos UI that the new version of Agents A in cluster 1 and 2 are running and all used connectors are shown in the UI
- Perform the process detailed above for Agent B in cluster 1 and Agent B in cluster 2
- Validate in the Lumos UI that the new version of Agent B in both clusters is running and all used connectors are shown in the UI
If you have any of the following situations:
- Any connector exists only in one agent
- You are running multiple clusters with no duplicate agents within the clusters
- only a single agent exist
there is no safe way to upgrade or restart your agents. We suggest temporarily adding additional agents instances as necessary to prevent downtime.
Tips
Restarting/Terminating the Agent
Windows
-
Stop/Restart Windows Service:
- Open Services → Lumos Agent Service.
- Click Stop or Restart.
Docker (UNIX Systems)
- Restart:
docker restart <CONTAINER ID or NAME>- Stop:
docker stop <CONTAINER ID or NAME>Useful Docker Commands
#Copy file from container folder to local folder
docker cp <CONTAINER ID>:/onprem/agent/settings.toml .

#Copy file from local folder to container folder
docker cp ./settings.toml <CONTAINER ID>:/onprem/agent

#List available connectors
docker run --platform linux/amd64 public.ecr.aws/lumos/on-premise-agent:latest list-available-connectors
These commands are helpful if you need to quickly modify configuration files (like settings.toml) or inspect logs from the container on your host machine.
Troubleshooting
Debug LoggingThe agent writes logs to a logs folder within the agent directory. If you need to increase log verbosity for debugging:
- Open the settings.toml file in the agent directory (Windows) or in /onprem/agent (Docker).
- Add (or edit) the [agent-settings] block:
[agent-settings]
LOG_LEVEL = "DEBUG"
- Restart the agent (Windows Service or Docker container) for the change to take effect.
- Once troubleshooting is complete, remove the LOG_LEVEL setting (or set it back to default) to prevent excessive log growth.
401 Unauthorized upon starting the Agent and the Agent stops
This indicates that the On Prem Agent token is not valid. The agent makes an initial call to Lumos as it starts to validate the connection.
- Create a new On Prem Agent Token in the Lumos UI and copy this as the LUMOS_ON_PREMISE_AGENT_API_KEY environment variable
Error Logging
🔍 Critical Log Forwarding to LumosThe Lumos On-Premise Agent can forward critical (Error level) logs to Lumos for enhanced debugging and proactive issue detection. This feature helps Lumos support teams diagnose problems more effectively, especially when customers have limited access to their own logs (e.g., in AWS ECS environments).
What gets forwarded:
- Critical agent logs (Error level and above)
- Critical connector logs (Error level and above)
- Logs include debugging attributes like domain_id, operation_id, and connector app_id
- All logs are sanitized to prevent sensitive data exposure
How to enable:
Windows:
Set the environment variable as a system variable:
- Go to Control Panel → System & Security → System
- Click Advanced system settings → Environment Variables
- Under System variables, click New
- Variable name:
LUMOS_ON_PREMISE_AGENT_SEND_CRITICAL_LOGS_TO_LUMOS- Variable value:
true- Click OK
Or use PowerShell:
setx /M LUMOS_ON_PREMISE_AGENT_SEND_CRITICAL_LOGS_TO_LUMOS "true"Restart the Lumos Agent Service for the change to take effect.
Docker/Container:
Add the environment variable to your container run command:export LUMOS_ON_PREMISE_AGENT_SEND_CRITICAL_LOGS_TO_LUMOS=true docker run --platform linux/amd64 -d \ --restart unless-stopped \ -e LUMOS_ON_PREMISE_AGENT_API_KEY=$LUMOS_ON_PREMISE_AGENT_API_KEY \ -e LUMOS_ON_PREMISE_AGENT_SEND_CRITICAL_LOGS_TO_LUMOS=$LUMOS_ON_PREMISE_AGENT_SEND_CRITICAL_LOGS_TO_LUMOS \ public.ecr.aws/lumos/on-premise-agent:latestSettings.toml configuration:
Alternatively, you can configure this in yoursettings.tomlfile:[agent-settings] SEND_CRITICAL_LOGS_TO_LUMOS = trueSecurity and Privacy:
- This feature is disabled by default for security reasons
- You may opt out at any time by setting the environment variable to
falseor removing it entirely- All forwarded logs are sanitized to remove sensitive information
- Only Error level and above logs are forwarded (no INFO or DEBUG logs)
- Logs are sent securely to Lumos via the existing on-premise proxy service
Verification:
Once enabled, you can verify the feature is working by:
- Checking that the agent starts without errors
- Looking for log entries in your local logs indicating the Lumos log handler is configured
- Contacting Lumos support to confirm logs are being received (if needed)
Disabling the feature:
To disable critical log forwarding, set the environment variable tofalseor remove it entirely, then restart the agent.
Troubleshooting Connectivity IssuesThe most common installation issue is blocked HTTPS outbound traffic. Be sure that:
https://integration-proxy.lumos.com is reachable on port 443.
If you see an SSL or connection error in the logs, verify firewall/proxy is not blocking or inspecting the traffic.
You can open a web browser (on the same server/network) to https://integration-proxy.lumos.com/external/firewall-test:
- If you see "Endpoint not found", it means your firewall is not blocking traffic (the site is reachable).
- If you get no response or a network error, then there is likely a firewall issue.
Note: Some Windows environments require configuring a system-wide proxy if Internet Explorer is used behind a proxy or gateway.
Similarly, verify connection to the system the Agent is connecting to. For example, Active Directory, is reachable on port 636.
Use the commands below to verify connectivity.
Windows PowerShell Commands to Verify Connectivity#Verify HTTPS/443 Connection to Integration Proxy: Test-NetConnection -ComputerName integration-proxy.lumos.com -Port 443 #Verify TCP/636 Connection to Active Directory: Test-NetConnection -ComputerName ad.yourdomain.com -Port 636 #Verify TCP/1433 Connection to Microsoft SQL Server: Test-NetConnection -ComputerName sql.yourdomain.com -Port 1433Expected Output
ComputerName     : integration-proxy.lumos.com
RemoteAddress    : 54.191.37.89
RemotePort       : 443
InterfaceAlias   : Ethernet 2
SourceAddress    : 192.168.1.21
TcpTestSucceeded : True
If the connectivity works using commands above but the Agent is still not able to connect, add the following System Environment Variables on your Windows Server:
HTTP_PROXY=http://proxy_ip:proxy_port
HTTPS_PROXY=http://proxy_ip:proxy_port
Docker Commands to Verify Connectivity#Verify HTTPS/443 Connection to Integration Proxy: docker exec -it <CONTAINER ID> wget --spider https://integration-proxy.lumos.com:443 #Verify TCP/636 Connection to Active Directory: docker exec -it <CONTAINER ID> wget --spider https://ad.yourdomain.com:636 #Verify TCP/1433 Connection to Microsoft SQL Server: docker exec -it <CONTAINER ID> wget --spider https://sql.yourdomain.com:1433Expected Output:
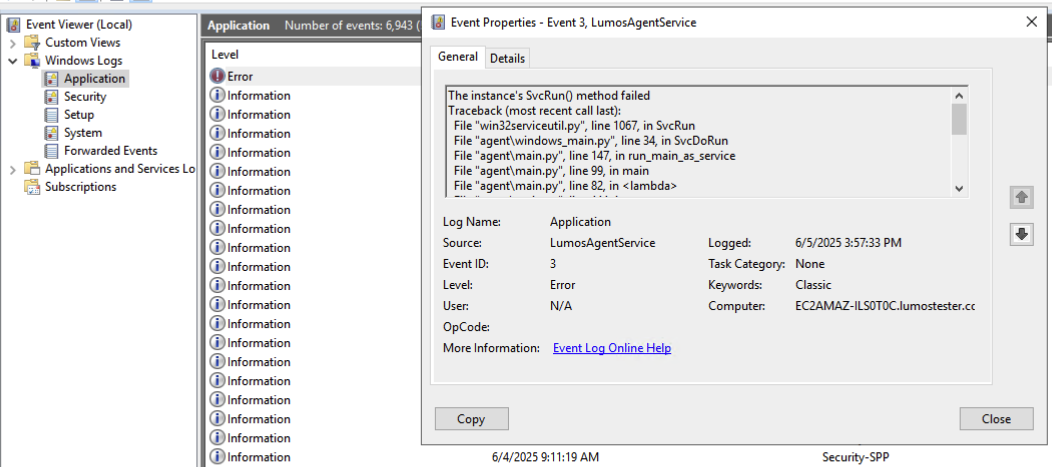
Spider mode enabled. Check if remote file exists.
--2025-02-05 20:11:13--  https://integration-proxy.lumos.com/
Resolving integration-proxy.lumos.com (integration-proxy.lumos.com)... 54.188.36.246, 54.191.37.89
Connecting to integration-proxy.lumos.com (integration-proxy.lumos.com)|54.188.36.246|:443... connected.
Additionally for Windows agents, the Event Viewer can display information about why the agent failed to start or connect. In the Event View, navigate to Windows Logs >> Application and look for errors associated with the LumosAgentService.
Connectors Zip Files
- You’ll notice a folder named “connectors” under agent. Please do not rename or move any of the folders or generated files.
- Do not unzip any connectors files! The agent unzips them automatically on runtime.
You’re Done!
You should now have a clear, functioning Lumos On-Premise Agent installation—either on Windows as a service or running in a container. Make sure to monitor logs, keep your environment variables secure, and verify connectivity to ensure everything remains operational.
For further details or troubleshooting, visit your Lumos dashboard.
You can now deploy the Connectors to integrate with Active Directory, LDAP or Databases.
Updated 2 months ago